|
Journal
Phuket Refit 2002
Contact Us
Poems
Site Map
Search
| |
During preparations and as a result of
experience, we have made a number of changes to the boat - the ones we
have captured here may be appropriate to other boats as well. Also, we refitted
many of the systems in Phuket, Thailand in 2002.
Furling head and stay sails - We installed a ProFurl N42 system in New Zealand
(to replace the the Mariner furler - a system that permitted furling a hank-on sail, but it could not be
reefed) and have been
extremely happy with it and its performance. We found a small used Mariner
furler, and installed it on our staysail. This makes
deployment of the staysail a breeze (no pun intended) so we experiment more
readily, and since it still hanks on we can easily replace it with a storm sail.
Since Mariner is out of business, if anyone needs a copy of an old manual
download our Mariner
Manual from here.
Furling Drifter - We installed a Doyle drifter with a
Harken 435
small-boat furler, built-in kevlar headstay, and sail - hoist it on a spinnaker
halyard, unfurl and go! It is easy to stow, great in light winds,
and the only downside is that when the wind picks up, it is impossible to furl
completely unless you can blanket the drifter behind the main sail.
Single Line Reefing - Our slab reefing system on the main required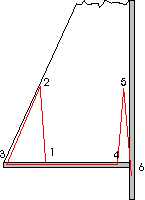 putting a ring on the tack over a hook, and separately hauling in on a line
through the clew. We have replaced this with a single line which pulls the
tack and clew down simultaneously. It is a little slower and has some
frictional loss, but it is safer and more convenient. We then upgraded to
a Selden boom which has the single-line reefing hardware built into the boom,
and it is better and has even less friction.
putting a ring on the tack over a hook, and separately hauling in on a line
through the clew. We have replaced this with a single line which pulls the
tack and clew down simultaneously. It is a little slower and has some
frictional loss, but it is safer and more convenient. We then upgraded to
a Selden boom which has the single-line reefing hardware built into the boom,
and it is better and has even less friction.
Lead Lines to Cockpit - As a step to easing sail control, we have led
most main lines to the cockpit: halyard, both reef lines, staysail sheets, and
topping lift. They go through line-stoppers to one of 3 winches on the
coach-roof. When the wind picks up, one or two people can readily ease the main
halyard and pull 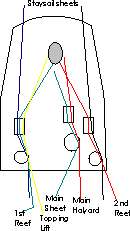 in
the single-line reefing lines and thus do 90% of the work from the cockpit under
the protection of the dodger. Downsides? in
the single-line reefing lines and thus do 90% of the work from the cockpit under
the protection of the dodger. Downsides?
Friction - all lines go through more blocks and thus take a little
more effort, but in the cockpit we have winches and places to brace ourselves,
so this is not a real problem.
Line snags on deck - When the sail is lowered to reef, the reefing
lines will occasionally catch on deck hardware and one of us has to go on deck
to free it - we try to quickly take up all slack in the reefing lines as we lower the sail.
Line clutter in the cockpit - with the reefs in, we end up with 150'
of lines of various colors and sizes in the cockpit to coil up and keep out of
the way - a nuisance but acceptable.
When purchased, Long Passages had an ice-box - period. For living
aboard and cruising we felt we needed refrigeration and installed an Adler
Barber Cold Machine. When we got to the tropics we found it ran 60% of the
time (surprise!) and we decided to re-insulate. We found it had 1" of wet
styrofoam. We used "39 Ways to Improve Your Icebox" from Weems
and Plath and:
- Installed 4-6" polyurethane panels all around
- Lined box in 'space blanket' material
- Lined box with plywood, covered in fiberglass and impregnated with resin,
fastened in place with sealant
This reduced our run time to 25-30%, normal for this unit. Unfortunately we
used polysulfide sealant and the sulfur odor permeated food for almost a year
after the installation.
- Closed off Pilot Berth - Long Passages was built with a pilot berth, a
comfortable amidships berth for a small crewmember of a large crew. With
only 2 of us on board it was wasted space and we have converted it to useful storage:
- Charts - about 200 folded charts, dry and secure
- Books - about 50 of our navigation books
- CDs and miscellaneous items - lots
- Computer printer and supplies
- The pilot berths on most boats we have seen have also been replaced
with storage. This was done crudely by Bob in the US, and more
elegantly in Thailand - see Phuket
Refit.
- Navigation Table - This large table for charts and
navigational tools had lots of knee room and little
storage. A pre-made drawer unit was installed under it to hold all of those
little things one needs at hand: gloves, locks, glasses, snatch blocks, tank
cover keys, lead-line, etc. A second drawer was added to provide the "80%
tools", i.e. those tools used 80% of the time. It also holds our laptop in a waterproof
Pelican case and all engine manuals.
- Wine and Liquor - Our Captain's table is typical - 2 leaves that fold down out of
the way when not in use - leaving a 8" gap in the middle. We built a bottle
storage compartment in this space to hold 8 bottles.
- Dry Locker - Inaccessible space under galley counter can now be
reached through a lid on the counter-top to stow pans, bottles, and food.
- 'V' Berth - Under the 'V' berth
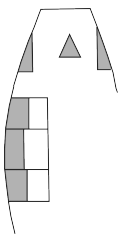 we installed
a storage area
and on each side of the berth are deep 'V' shaped storage areas for clothes and
tools. The sketch shows where we picked up storage space.
we installed
a storage area
and on each side of the berth are deep 'V' shaped storage areas for clothes and
tools. The sketch shows where we picked up storage space.
- Behind Drawers - Three port settee drawers had unused space outboard
of them - plywood partitions were fiber-glassed in place and several cubic feet were
gained to store items, including provisions for long trips.
- Safety - We have put positive locking catches on all
storage areas, including floor-boards, ice-box, drawers and locker
doors. Our thought has been: what could fall open if the boat
rolls over? We have tried to lock all compartments so they
will stay shut in a roll-over.
Initially supplied with with a single berth to starboard and a workbench/vise
to port, we converted to a Queen sized 'V' berth with a design 'plagiarized'
from Summer Salt, a sister-ship sailed over 100,000 miles by Dale and
Spence.
We developed a fresh water leak and
discovered there was no access to the tanks - they were sealed under a solid
floor. A skilled boat-builder cut a hole to my specifications so that we
could remove the tanks, and then turned the floor into a removable panel in
the event of future problems. The problem turned out to be a corroded
$0.75
hose clamp, and it only cost $5000 to fix.
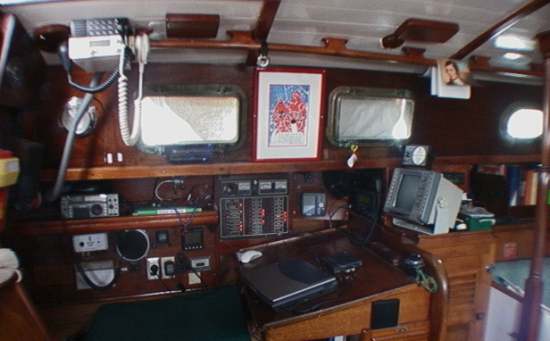
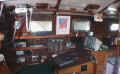
The navigation area had no navigation instruments and the electrical
breakers were distributed around the boat. The changes we have made
include:
- Consolidated electrical power panel. Newmar AC/DC
- Dedicated shelves for Ham and SSB radios and
Inmarsat C
- Electrical outlets for laptop and accessories
- 110 and 220 VAC inverters around the navigation area.
- Instrument repeater and redundant depth sounder.
- Radar and C.A.R.D. radar detector viewable from navigation table and companionway
- VHF radio and hailer accessible from navigation table and companionway.
- Spray protection - we installed a sailcloth partition between the
companionway and the navigation station to protect it from spray or green
water. It mounts into track top and bottom and has an opening for access to
VHF radio and hailer.
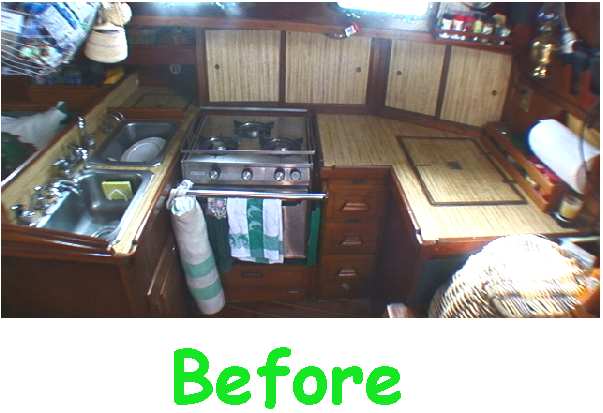
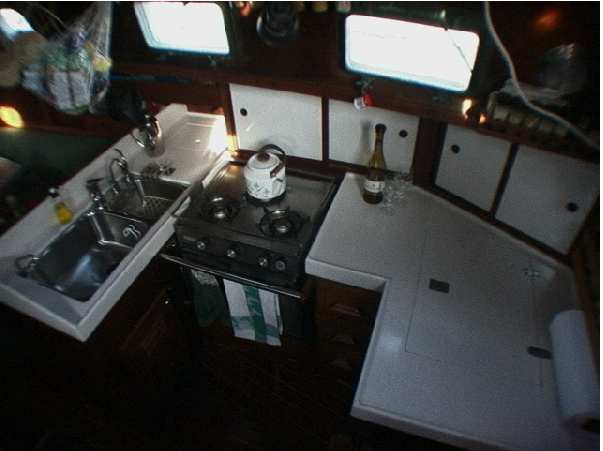
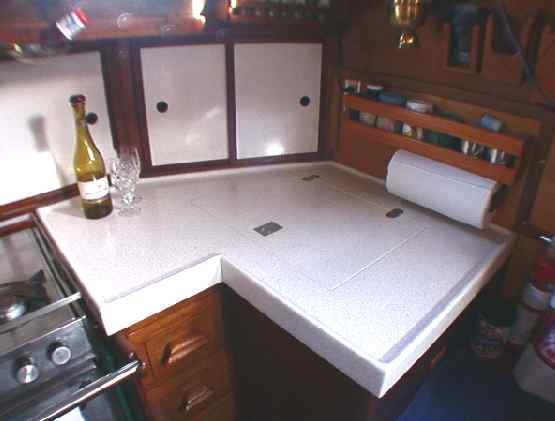
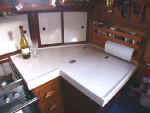
After 25 years, the galley was growing a bit long in the tooth
and after seeing the new countertops on our friend's boat, 'Moonshadow',
we decided to take the plunge. So we upgraded:
- Countertop - Replaced aged Formica countertops with
Corian-like molded units with integral fiddles and backsplashes.
- Sink - Replaced 2 sinks with a double stainless steel sink
that has a neat platform for all plumbing, mounted under the counter so all
water runs into the sink.
- Faucet - Replaced faucet with streamlined
single-handle
control.
- Vents - Replaced miscellaneous tank vents and
water-maker fittings with a purpose-built assembly that is neat and will be
easy to clean.
- Doors - Replaced sliding doors on galley lockers so
they match the countertop.
All in all we are quite happy with the results, and the
countertop is now a dream to keep clean - set for another 25 years! Below
are a couple of before and after pictures if interested. Total project cost was
approximately $US1500.
 and
and 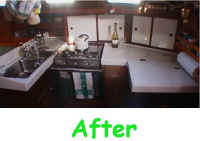
and a few views of the finished product


The cost of satellite technology has continued to drop, and
several events prompted us to upgrade while in Singapore in 2001:
- Plan to cruise through areas of potential piracy (Malacca
Straits and Red Sea)
- Iridium satellite phone costs dropped from $3000 to $600
and airtime from $7.00/min to $1.50/min.
- An Inmarsat C unit became available on eBay
for $250 rather than $2500.
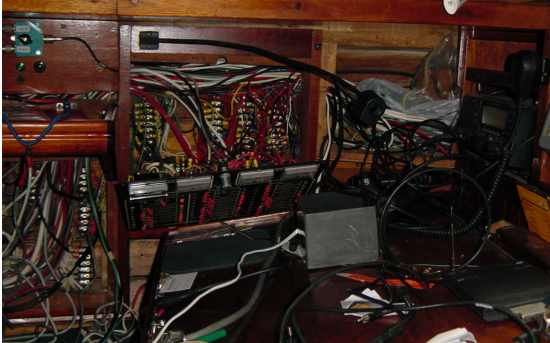
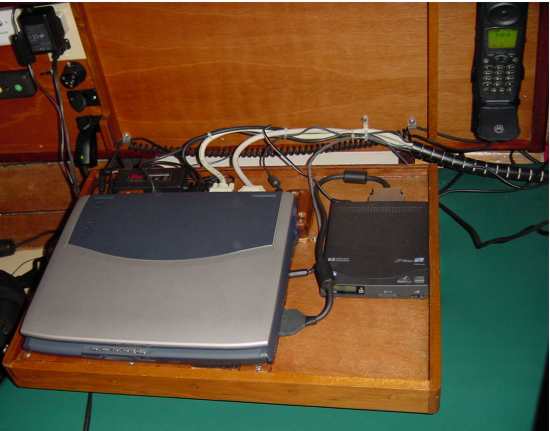
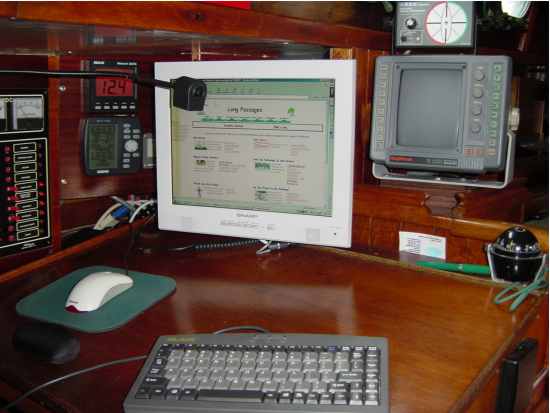
All of this resulted in a major re-design of the navigation
area:
- Secure laptop into a cabinet out of view and away from salt
water.
- Install an LCD display monitor on a flexible arm and
a keyboard for remote use.
- Relocate instruments to make room for the laptop.
- Install the Seasat 2 Inmarsat C unit with an antenna on the
top of the mizzen.
- Install the Iridium handset within reach of the navigation
table.
- Connect all units through a serial switch to the laptop for easy
email and web site updates.
The entire project has cost approximately $2000 and taken over a month
but we have a much
cleaner and more functional communication system (see our Communications
page for some of the trade-offs we examined).
Check out some before and after shots below.
BEFORE:

and while "progress" was being made:
AFTER:


|